Understanding Oauth 2.0 and OpenId Connect


Authentication and Authorization
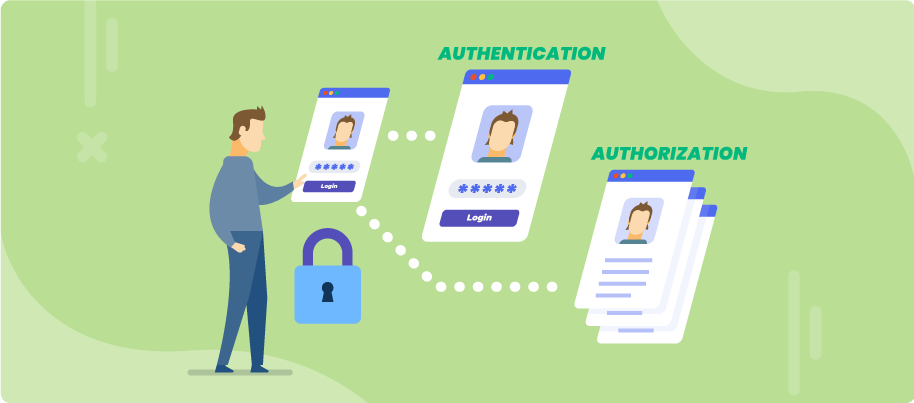
Before talking about Oauth 2.0, first, let's grab a basic concept about what is Authentication and Authorization. We can all find this both terms generally used in the information security topic and they both have fundamentally different functions.
Authentication is simply a process of verifying who the user is and what they claim to be. Let's say you claim to be 20 years old then you can show your personal id to authenticate about your age, or while reaching your workplace you show your id card or fingerprint to a scanning device to mark your attendance.
Authorization is the process of verifying what a user has access to or if the user is authorized to do something. Like, if you have a driving license for a motorbike then you are authorized to ride the bike but if you go on riding a car with the same license you are going to get in trouble cause you are not authorized to do so. Another example can be a customer of an e-commerce website are not authorized to view the admin portal.
Authentication usually occurs before Authorization and if users can't authenticate themself then they are not authorized to access the resources.
Now, In the case of a web or mobile application a login form is a simple authentication system and after we are logged in successfully the resource that will be accessible to us are only the resource that is authorized to us. Besides a simple login form now most of the websites have a third-party login such as Facebook or Google login. All these third parties generally follow the same protocol which is OAuth 2.0 for the authorization and OpenID connect for authentication.
Delegation Problem
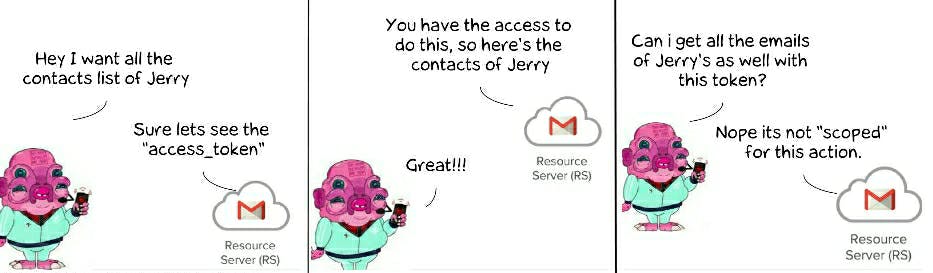
Let's say we have an application known as Glootie app and this application has a feature to send pictures or files to all the Gmail contacts of its users. Let's see how they would have handled this task before the OAuth 2.0 was invented.
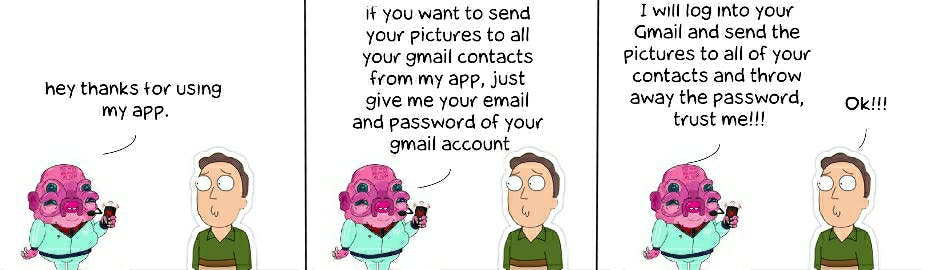
We will be seeing this two character Glootie (the red alien) and Jerry from the epic show (Rick and Morty- S4: E2) most of the time in this post. I thought this might help the readers to easily understand the topic.
First of all, never be like Jerry and provide any application with such access. The above picture depicts a delegation problem where we need to authorize an application to have entire access to our other application such as gmail or google drive in order to use some service of that application. What if we want to let the application to only access the contacts or certain information. This is why OAuth protocol was built to solve this problem.
OAuth 2.0 as Authorization
Lets say, Glootie app just integrated a Sign In With Google feature which uses OAuth 2.0 protocol. Lets look at the first step that occurs whrn a user tries to sign in with google.
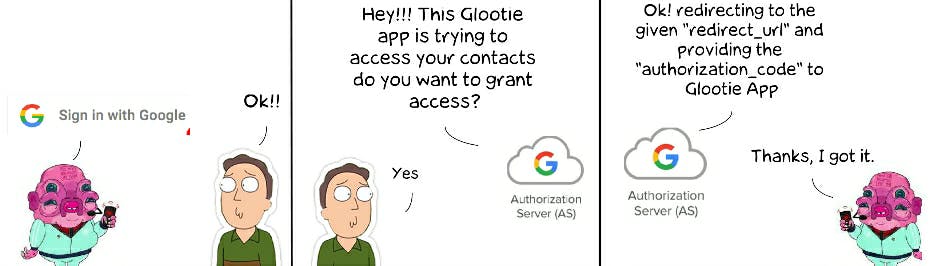
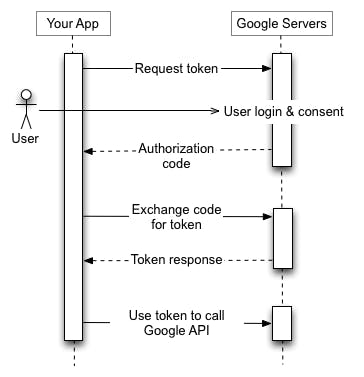
At first when we click the Sign in With Google button in the web application then we will be redirected to Google domain page or authorization server where we need to login with our Google email and password if not already logged in. After logging in we get a prompt with a consent page saying "Glootie app is trying to access this from your account. Do you want to authorize the application?".
If we click yes/allow then we will be redirected back to the "redirect_uri" of the Glootie application with an authorization code.
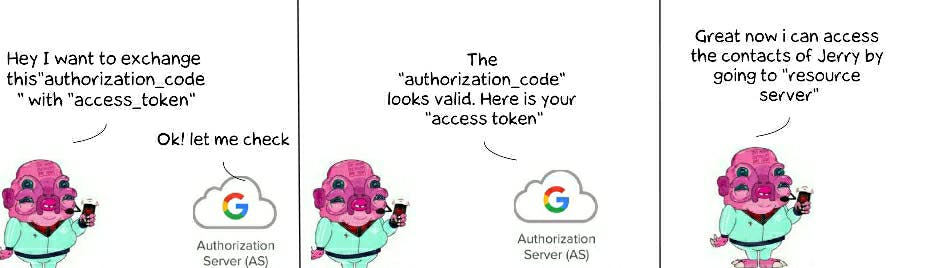
The client ( Glootie App ) actually wants an access token to access the contacts of Jerry. So, the app goes back to the authorization server to get the access token by providing the authorization code to the server. If the authorization code provided by the client is not expired or is still valid then the client is provided with the access token.
Since the Glootie app now has got the access token it can go and ask for access to Jerry's contacts.
In order to get access to the contacts of resource owner (Jerry) the app needs to provide the access token to the resource server. Then the server checks the token and what kind of resource it has access to and provides the resource to the app. In case if Glootie app tries to make the request of resource they don't have access to for eg: delete all the contacts then they are declined by the resource server.
OAuth 2.0 Terminology
Client: The application that wants to have access to the resource. In our case, the Glootie app wants to have access to the resource.
Resource owner: The owner of the resource that the other application wants to have access to. In our case Jerry is the resource owner.
Authorization Server: The server that provides the grant type such as authorization code to the client after the resource owner allows to do so. In our case accounts.google.com.
Resource Server: The resource server holds the data or resource that the client wants to have access to.
Authorization Grant: When the resource owner provides the client access to the resource server then the client is provided with an authorization grant. In our case, the grant is provided with an authorization code which can be used by the client to exchange access_code but there can be another grant type too where the access token can be directly provided to the user. Click here to know about other grant types.
Redirect URI: When asking for an authorization grant to the authorization server it needs to have a property that tells the authorization server to redirect to somewhere back to the client after the authorization is provided. This property is known as redirect_uri.
Access Token: To have access to the resource server the client needs to have an access token.
Scope: Scope is a mechanism in OAuth 2.0 to limit an application's access to a user's account. There can be a list of scopes available in the authorization server. Client while asking for an authorization grant can send the scope property along with the resource type to get access to only those particular scope. For example, let's say a read or delete scope. And according to the scope provided the resource owner is also notified by the authorization server that the client is asking for access to these scopes in the consent screen. The access token issued to the client will be limited to the scopes granted.
We just learn the basic work-flow and terminology of OAuth 2.0. Let's see a quick example of how our application should make a request to the authorization server and all other following processes if it wants to use a Google Login feature.
OAuth 2.0 Workflow in a Web Server Application
First, our app need to have OAuth 2.0 credentials such as a client ID and client secret that are known to both Google and our application. We can visit the Google API Console to obtain it.
Let's try to get the authorization code from Google for our app.
https://accounts.google.com/oauth2/v2/auth
?client_id=asd1234yrasdgj12346saSDfadh1234u6rtjfdsfadjbhklkbhg4568986tyfgfg
&redirect_uri=https://myapp.com/redirect
&scope=read write
&response_type=code
&response_mode=form_post
&state=sometext
&nonce=8x5baw1b31o
After the request above, the resource owner is provided with a consent screen to grant the authorization. If the user says yes or there was no error then the authorization server redirects to the provided redirect_uri with the authorization code. If there was an error or authorization was not granted then the authorization server will redirect with an error.
https://myapp.com/redirect?code=ada2Qasd2FAwa2r3rf4&state=sometext
let's exchange this code with access token.
URL: https://www.googleapis.com/auth/v4/token
Content-Type: application/x-www-form-urlencoded
code=ada2Qasd2FAwa2r3rf4
&client_id=asd1234yrasdgj12346saSDfadh1234u6rtjfdsfadjbhklkbhg4568986tyfgfg
&client_sectet=app_client_secret
&grant_type=authorization_code
The authorization server will return an access token for the above api request if the code is valid.
{
 "access_token":"asdOasd1asdKADdf1233tgdad00df",
  "token_type":"Bearer",
  "expires_in":4000,
  "refresh_token":"IzH6bFh6laf6gQ6TgA3sj19mfgA5egZx9a",
  "scope":"read write"
}
Finally, our app can use this access token to make a request to resource server API.
For example, let's access the calendar of the user. Our scope provided was read and write so our app must be able to read the events from the user's calendar and write or create new events as well.
The access token should be provided as a Bearer credential in an HTTP Authorization header.
GET /calendar/v1/events

Authorization: Bearer asdOasd1asdKADdf1233tgdad00df
After the access token is successfully validated by the API, the application is now allowed to read and write to the user's calendar.
Access tokens have limited lifetimes. If our application needs access to this calendar API beyond the lifetime, it can obtain a refresh token. A refresh token allows our application to obtain new access tokens without prompting the user for an authorization grant.
OpenID Connect as Authentication.
OAuth 2.0 APIs can be used for both authentication and authorization. For the authentication part we can use the OpenID Connect which is a simple identity layer on top of the OAuth 2.0 protocol. It allows Clients to verify the identity of the resource owner to obtain basic profile information about them before the whole authorization process.
For this, to work we need to add an additional scope as 'openid' in the request.
https://accounts.google.com/oauth2/v2/auth
?client_id=asd1234yrasdgj12346saSDfadh1234u6rtjfdsfadjbhklkbhg4568986tyfgfg
&redirect_uri=https://myapp.com/redirect
&scope=openid read write
&response_type=code
&response_mode=form_post
&state=sometext
&nonce=8x5baw1b31o
OAuth 2.0 adds another token known as id token along with the authorization code in the response. This id token is in encoded JWT (JSON Web Token) format. We can decode this Id token here and get the basic information about the users.
Great we have come to the end of this topic. I hope this helped you to understand the concept of OAuth 2.0, how it's used to solve the delegation problem, and how OpenId Connect can handle the authentication part separately.
More Resources: